

Belfort is a strategic board game where players build a city, collect resources, and compete to score the most points. Key elements include intense competition and diverse strategic choices.
Belfort
2-5 people | 120 minutes | Store1: B2, Store2: Not Available
Esteemed Master Architect,
The Department of Official Apologies and Bad News Delivery would like to officially apologize to you. You see, there's been a slight clerical error. Instead of hiring only one supervisor to oversee the construction of Belfort-our kingdom's glorious new castle on the wild frontier of Troll country-we have somehow contracted several to do the job at the same time. That means there will be other Master Architects poking around, building things where you want to, competing for precious lumber, stone, metal and gold, hiring the best Dwarves, Elves, and Gnomes out from under you, cozying up to the King when you're not looking, and generally getting in your way as much as possible.
As much as it would be great if all of you could be friends, you can't afford to let your competition out-build you or out-hire you. After all (and here's the Bad News Delivery part of this job), there is only one Key to the City; we can't just chop the thing up and divvy it out. So, in his great wisdom, the King has decided that when the building season ends at the first snows, he will award it to the one who has shown him or herself to be truly deserving of the honor. Please accept this Official Apology for this sudden twist, and remember that your signed contract is legally (and magically) binding. Good luck, Master Architect!
Yours officially,
Rudwig P. Hornswimmons
Deputy Assistant to the Assistant Deputy
Dept. of OA & BND
GAME OVERVIEW
In Belfort, players appoint their crew of loyal Elves and Dwarves to perform various tasks; chief among these tasks is collecting the money and raw materials needed to construct buildings in the five districts that make up the city. Every property comes with unique abilities that can help its owner on the path to success; Gnomes can be hired to staff many of the buildings, permitting access to bonus abilities. Utilizing the city's five powerful Guilds could also play a big part in achieving victory.
A player's influence in each district grows with each new building he constructs; players will have to decide not only what type of building to construct, but also when is the most effective time to do so, and where it should be built.
Points are awarded three times during the game, based on each player's influence in each of the five districts and among the Elves, Dwarves, and Gnomes. At the end of seven rounds, the player who has earned the most points will win!
ICONS
Throughout the game you will find a few icons in common use.
 Or
Or Wood OR Stone
 Gold
Gold Pub
Pub Gardens
 Tower
Tower Inn
Inn Blacksmith
 Bank
Bank Market
 Gatehouse
 Library
 Keep
Keep Wall
Wall Guild
GuildCOMPONENTS
5 GAMEBOARD DISTRICTS
You'll be butting them together to form a lovely picture of how the bustling castle of Belfort will look once it's built. Each district has a number of features on it that you'll need to know during the game. Aside from a few minor details, each district is basically identical in layout. You should be able to find your way around quite easily.

KEY TO THE CITY
 To be bestowed upon the glorious winner of the game amid reluctant congratulations and thinly-veiled implications of cheating.
CALENDAR BOARD
This handy board will keep track of the season, remind you of Trading Post prices, and serve as a stockpile for Gnomes and Property Cards.

COLLECTION BOARD
Used to organize the resource stockpiles. You will also be sending workers here to gather resources and engage in other activities.

50 PROPERTY CARDS
These cards represent the ten property types that you can build during the game. There is a detailed description of each card in the Properties Appendix.


5 TURN ORDER CRESTS
Your crest tells you your place in the turn order.

1 CALENDAR MARKER
 Keeps track of the current month.
5 PLAYER BOARDS
Use your board to organize your workers and resources. The board also features reminders about the order of play, scoring, and property prices.

12 GUILD TILES
Each game will feature 5 random Guilds in Belfort. During the game you can send workers to the Guilds to take powerful actions; there is a detailed description of each Guild in the Guilds Appendix. You can even pay resources to "build" the Guilds and earn income from them. There are three different categories of Guild (distinguishable by the letter on their back side): Basic, Resource, and Interactive. These categories will help you determine which Guilds to use in your game.


Resources
Resources are what you need to get things done in the game. Wood, Stone, Metal, and Gold. You'll be gathering and spending all of these to accomplish pretty much everything.

Resources are not meant to be limited by the number of pieces in the If the supply ever runs out of a resource, a player can use the included multiplier chips to make change and return some to the supply. For example, if the supply runs out of Stone, a player with a lot of Stone could return 5 Stone to the supply, then take 1 Stone on a x5 multiplier chip.

WORKERS
Resources won't gather themselves. Between the Dwarves and the Elves, you'll be able to bring in all four of the resources you need. Don't forget the Gnomes... they staff your buildings and allow you access to locked actions. Hiring lots of workers is also one of the ways to earn points in the game.
35 DWARVES: 7 in each player color. 5 Dwarves per player have a Master Dwarf on the back.
35 ELVES: 7 in each player color.. 5 Elves per player have a Master Elf on the back.
22 GNOMES:


The first time you play you will need to apply stickers to your Worker markers. First apply the Dwarf, Elf, and Gnome stickers to the fronts. Then flip 5 Dwarves and 5 Elves of each color over and apply Master Dwarf and Master Elf stickers to each of those.
60 PROPERTY MARKERS
12 per player. Use these to show that you have built specific locations in Belfort. Dominating districts with your own buildings is the way to big points.

Players aren't likely to run out of Property markers during a game, but in the very rare case that someone does, use something else as a substitute marker.
5 SCORING MARKERS
1 per player. These let you track your score on the scoring track.

GAME SETUP
Ⓐ Game Board: Place the five districts together creating a pentagon-shaped game board depicting the castle surrounded by a scoring track. (Make sure the districts are in the right order by noting the numbers on the scoring track.)
• Guilds: Choose 5 Guilds (see below) and place the 5 selected Guild tiles face up on the board in the Guild locations. It does not matter which Guild goes in which district. Return the unused Guild tiles to the box; they will not be needed.
~Beginner Game: Randomly select 3 Resource Guilds and 2 Basic Guilds.
~Normal Game: Randomly select 1 Resource Guild, 2 Basic Guilds, and 2 Interactive Guilds.
~Advanced Game: Either choose all Guilds randomly, or players can agree which Guilds they want to play with.
Ⓑ Collection Board: Place the Collection board near the game board. Make supply piles of all four resources (Wood, Stone, Metal, Gold) beside the relevant resource areas of the Collection board.
Ⓒ Player Materials: Have each player choose a color and give them each one set of like-colored playing materials. Return unused colors to the box. Each player gets:
• 1 Player Aid
•7 Dwarves and 7 Elves: Each player keeps 3 Elves and 3 Dwarves in their color and puts them near their Player Aid with the Master side down. The remaining Elves and Dwarves from all players are gathered into a worker supply near the game board. (Ideally where nobody will confuse them for "in play" Elves and Dwarves.)
• 12 Property markers: Kept near the Player Aids as shown.
• 1 Scoring marker: Stacked near the start of the Scoring Track on the game board.
In addition, each player takes:
• Starting Resources: Each player takes 1 Wood, 1 Stone, 1 Metal, and 5 Gold. (The Player Aids display reminders of these amounts.) Resources are kept near the Player Aids as shown.
• Starting Hand: Shuffle the deck of Property cards. Each player is dealt a hand of 5 Property cards from the deck. (Player hands are kept private at all times.) Each player looks at their cards and chooses 3 to keep, discarding the other 2 into a shared face-up discard pile.
• Turn Order Crests: Take Crests to match the number of players in the game. Return any unused Crests to the box. (For example in a 3-player game keep Crests 1-3 and return crests 4 and 5 to the box.) Randomly distribute a Crest to each player. Each player keeps their crest face-up on their Player Aid as shown.
Ⓓ Calendar Board: Place the Calendar board near the game board and set up the following items:
• Gnomes: Take 9/14/18/22 Gnomes for 2/3/4/5 players and place them on the "Gnomes for Hire" area. (There is reminder chart there listing how many are needed.) Return any unused Gnomes to the box; they will not be used for this game.
• Calendar Marker: Place it next to the first month of Spring as shown.
• Property Cards: Place the deck of Property cards on the Calendar board where shown, to form a draw deck. Draw 3 cards from the deck and place them face-up next to the Calendar board as shown to form a draw pool.
Note: For a 2-player game there are some differences to setup and rules. Refer to the 2-Player Game Appendix to see the details.
Feel free to arrange the different boards so that the layout makes sense for your table space.

Throughout the game you must always keep your Elf and Dwarf markers with the "normal" side facing up. You should only flip an Elf or a Dwarf to its Master side when it has been legitimately upgraded during the game.
ROUND ORDER
Each game of Belfort lasts for 7 Rounds (represented by the months on the Calendar). Each Round is made up of the following 5 Phases:
1. CALENDAR The calendar is updated.
2. PLACEMENT Players take turns assigning their workers to various tasks.
3. COLLECTION Players gather resources and other assets.
4. ACTIONS Players perform actions using their resources and assigned workers.
5. SCORING In certain rounds only, players calculate their scores.
1. CALENDAR
Move the Calendar marker to the next month on the Calendar. (If this is the first round of the game, move it onto the first month of Spring.) Then proceed to the Placement phase.
Example: The fourth round of the game is starting. The Calendar marker is moved from the last month of Spring to the first month of Summer.

2. PLACEMENT
Players place their Workers (Elves and Dwarves) onto planks in the various areas on the Collection Board, the Guilds, or their own built Property Cards in order to gain a beneficial effect. Workers that do not get placed onto planks will go into the Resource Areas.
 A TYPICAL PLANK
Note the square and circle symbols; This means Elves or Dwarves only.
No Gnomes!
One at time, starting with the player who has the 1st Turn Order Crest and continuing in turn order, players either place one Worker or pass. (Once a player passes, he immediately distributes all of his remaining Workers into the Resource Areas and is finished for this phase-see Passing & Resource Areas for details.) Player 1 places one Worker onto a plank of his choice and then Player 2 places one Worker, and so on. Continue cycling through the turn order, placing Workers in this fashion until all players have passed. Workers may never be placed on already-occupied planks.
Planks can be found in the following areas:
RECRUITER'S DESK (to recruit new Elves and Dwarves during the Collection phase)
• The number of available planks at the Recruiter's Desk depends on how many players are in the game. There are 1/2/3 planks at the Recruiter's Desk in a 2-3/4/5 player game. These limits are noted on the planks as a reminder.
• A player must pay a fee of 2 Gold to the supply when placing a Worker at the Recruiter's Desk.
• An Elf placed at the Recruiter's Desk will recruit another Elf during the Collection phase, while a Dwarf placed there will recruit another Dwarf.

Example: In a 4-player game, Red has already placed an Elf on the first plank. Blue could place a worker (Elf or Dwarf) onto the second plank by paying 2 Gold. That would be the limit for this round since the final plank is reserved for 5-player games.
KING'S CAMP (to claim a better Turn Order Crest during the Collection phase)
• Players can place one Worker in the lowest- numbered unoccupied plank in the King's Camp.
• Each player can only place 1 Worker in the King's Camp per round.
Example: Nobody has yet played any Workers into the King's Camp. The first player to do so will occupy the plank marked "1" and will be the first to act when the King's Camp is resolved.

GUILDS (to perform that Guild's action during the Actions phase)
• Depending on who (if anyone) owns a Guild, there is a fee of 1 Gold to place a Worker there (more on owning Guilds later).
~If nobody owns it, the fee is paid to the supply.
~If the placing player owns it, there is no fee.
~If a different player owns it, the fee is paid to the owner.
 Example: The Miner's Guild is not owned by any player. A player could place a Worker on its plank by paying the 1 Gold fee to the supply.
PROPERTY CARDS (to perform that plank's action during the Actions phase)
• Players may only place a Worker onto a plank on their own built Property cards (not onto cards still in their hand).
• Some planks show a Gold fee. The fee is paid to the supply.
• Some planks are protected by a Gnome Lock. Such a plank is only available for placement if a Gnome has been placed to unlock it.

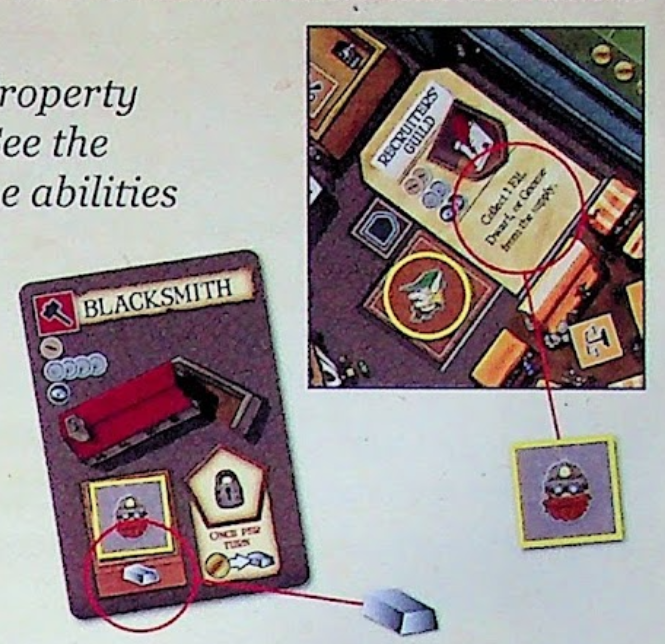
Example: This player built a Blacksmith and an Inn in earlier turns. Right now he could place a Worker on the Blacksmith's plank, but he cannot place one on the Inn's plank (which displays a fee of 1 Gold) because he has not yet unlocked it with a Gnome.
PASSING & RESOURCE AREAS
Once a player passes, he must place his remaining Elves and Dwarves (if any) in the Resource Areas on the Collection Board. Each of the four areas needs specific Workers to collect a single resource. Players can distribute their Workers however they want, and there is no limit on how many Workers can fit in any area. Workers placed in the Resource Areas don't actually collect their resources until the Collection phase.
 1 Elf placed in the Forest will collect 1 Wood.
 1 Dwarf placed in the Quarry will collect 1 Stone.
 1 Elf+Dwarf pair placed in the Mine will collect 1 Metal.
 1 Elf or 1 Dwarf placed in the Gold Mine will collect 1 Gold.
Once all players have passed and have distributed any leftover Workers into the Resource Areas, proceed to the Collection phase.
Example: Purple is the last one to pass and she has an Elf and a Dwarf remaining. She could place them in a variety of ways but decides to team them up and send them to the Mine where they'll be able to collect 1 Metal.
MASTERS AT WORK
Master Workers are very skilled at collecting from the Resource Areas... see the Collection
phase for details.
3. COLLECTION
Players now collect the Resources, Workers, Turn Order Crests, and Income they are due. The Collection board is resolved one area at a time from left to right, first the top row, then the bottom. As each area is resolved, the Workers there are reclaimed by their respective owners.

MASTER WORKERS EXPLAINED
The Resource Areas (Forest, Quarry, Mine, Gold Mine) are where your Master Elves and Master Dwarves shine. Each Master is counted as 2 normal Workers of its type (Elf or Dwarf) for collection purposes only. So a Master Dwarf in the Quarry would collect 2 Stone while a normal Dwarf there would collect only 1 Stone.

Even though they're great at collecting, your Master Workers still only count as 1 Worker each when determining who wins the bonus for a particular Resource Area (more on bonuses below).
① RESOURCE AREA: FOREST
For each Elf a player placed in the Forest, that player collects 1 Wood. The single player with the most Elves in the Forest collects 1 bonus Wood. (If there is a tie for "most Elves", nobody collects the bonus Wood.)

(Remember, the Master only counts as 1 Elf toward winning the bonus.) Both players reclaim their Elves.
② RESOURCE AREA: QUARRY
For each Dwarf a player placed in the Quarry, that player collects 1 Stone. The single player with the most Dwarves in the Quarry collects 1 bonus Stone. (If there is a tie for "most Dwarves", nobody collects the bonus Stone.)
③ RESOURCE AREA: MINE
For each Elf+Dwarf pair a player placed in the Mine, that player collects 1 Metal. The single player with the most Workers in the Mine collects 1 bonus Metal. (If there is a tie for "most Workers", nobody collects the bonus Metal.)
Example: Yellow collects 1 Metal with his Elf+Dwarf pair. Purple collects 2 Metal. (Remember, her Master Dwarf is counted as two Dwarves for collection purposes, so it can pair with her two Elves to effectively form two Elf+Dwarf pairs.) Purple also collects 1 bonus Metal for having the most Workers in the Mine. Both players reclaim their Workers.
④ RESOURCE AREA: GOLD MINE
For each Worker a player placed in the Gold Mine, that player collects 1 Gold. The single player with the most Workers in the Gold Mine collects 1 bonus Gold. (If there is a tie for "most Workers," nobody collects the bonus Gold.)

Example: Blue collects 2 Gold with his two Workers. Red collects 4 Gold with her two Master Elves (2 Gold each). Since they are tied for "most Workers", nobody gets the bonus Gold this round. They both reclaim their Workers.
⑤ RECRUITER'S DESK
For each Worker placed at the Recruiter's Desk, the owning player reclaims their Worker and collects one of their own Workers of the same type (Elf or Dwarf) from the Worker supply. This new Worker can be used for the remainder of the game.
・If there isn't a Worker of the correct type left in the supply to take, the action is wasted and the player simply reclaims the placed Worker.

Example: Red has an Elf at the Recruiter's Desk so she reclaims it and collects 1 new Elf from the supply. Blue has a Dwarf at the Recruiter's desk so he reclaims it and collects 1 new Dwarf from the supply.
⑥ KING'S CAMP
In placement order (left to right), each player with a Worker in the King's Camp swaps Turn Order Crests with another player (or may choose to claim their own crest) and reclaims their Worker.

・Each Crest can be taken only once per round; once a player has taken his turn in the King's Camp, he flips his new (or kept) Turn Order Crest face down (to the gray side) to indicate that it cannot be taken by anyone else this turn.
・Once all players in the King's Camp have taken their turn, all Turn Order Crests are flipped back up to the colored side.
Example: The players currently hold these Crests:
Yellow is first in the King's Camp. He swamps his Crest 4 for Red's Crest 1 and flips his new Crest over.
Now the players hold these Crests:
Red saw this coming during the Placement phase and made sure to be next in the King's Camp. She can't take the Crest 1 back because it has already been taken in this round. Instead she swamps her Crest 4 for Purple's Crest 2 and flips her new Crest over.
The players end up with these Crests:
Now that all players with a Worker in the King's Camp have taken their turns, all crests are flipped back face up.
⑦ INCOME & TAXES

First each player collects 1 Gold from the supply for each Income Coin showing on their built Property cards.
Then each player pays taxes according to the location of their Scoring Marker on the scoring track. (Each space on the Scoring track falls under a specific tax level.) For each Gold that a player cannot pay, they move their Scoring marker 1 space back on the score track. A player may not opt to lose points rather than pay taxes; all gold that can be paid, must be paid.
Example: Red has built a Keep, a Gatehouse, and a Tower. Only two of those three properties show an Income Coin, so she earns 2 Gold from the supply. Next we look at her Scoring marker. It is on space 15 of the Scoring track, which falls under the 2-Gold tax level. She pays 2 Gold to the supply; easy come, easy go!

Once all seven areas of the Collection board have been resolved, proceed to the Actions phase.
TAXES START LOW..., BUT CLIMB QUICKLY!
The tax amount for the first Tax Level (spaces 1-5 on the Score Track) is zero Gold. Every time you move into a new Tax Level, the tax amount increases by 1 Gold. Try to keep your income higher than your taxes!
Tax amount for this tax level
4. ACTIONS
In turn order, players take Actions. First, the player with Crest 1 completes all of the Actions he wants to (and is able to) perform, followed by the player with Crest 2, and so on until all players have taken their turn. Players can elect to do any or all of their possible actions in any order, any number of times unless otherwise specified.
BREAKING UP IS HARD TO DO
You can mix and match your actions however you like. For example you don't have to build all your properties at the same time, or activate all your workers at the same time. Sometimes breaking up your actions wisely can allow you to achieve clever combinations.
BUILD PROPERTIES

A player can build any Property card in his hand by paying the resources listed on the card (to the supply), placing that card face up in front of him, and placing one of his Property markers on one of the unclaimed Property symbols of that type on the game board.
This card is now considered a built property; its planks (if any) are open for placement during the Placement phase, it can be staffed with a Gnome (if it has any Gnome Locks) to unlock other abilities, and it will earn income during the Collection phase (if it features an Income Coin).


Example: Yellow has a Pub, Tower, and Bank card in his hand, and plenty of resources; looking at the board he notices that if he builds the Tower in a certain district, it will give him the district majority there. That helps him make up his mind; he spends the resources, places the Tower card in front of himself, and places one of his Property markers on the Tower symbol in that district.
BUILD WALLS
 Walls are not Properties and do not require a card to build. The cost of a Wall is 3 Wood+3 Stone (as shown on the Player Aids). To build, a player pays the cost to the supply and places one of his Property markers on any unclaimed Wall symbol on the game board. A player may build as many Walls as he can afford each turn.
•Although the illustration is continuous, each Wall symbol is considered a separate Wall for all game purposes.


BUILD GUILDS

Like Walls, Guilds are not Properties and do not require a card to build. To build an unclaimed Guild, a player pays the cost shown on the Guild tile to the supply, and places one of his Property markers on its Guild symbol. The player then owns that Guild. A player may build as many Guilds as he can afford each turn.
GUILD-O-NOMICS
Remember, there is no fee to place a Worker at the Guild if you own it. Also, if another player wants to place a Worker at your Guild, the fee is paid to you instead of to the supply. Ka-ching!

Example: Yellow notices that people have been using the Miners' Guild a lot, and supposes that it would be a nice source of income to own. He spends the resources and places one of his Property markers on its Guild Symbol.
ACTIVATE PREVIOUSLY-PLACED WORKERS
A player can activate a Worker that he placed on a plank (on a Property card or at a Guild) during the Placement phase of this round. (See the Properties Appendix and the Guilds Appendix for details of the abilities of each.) All Workers are reclaimed as they are activated.
・A player must activate and reclaim every one of his placed Workers at some point during his turn.
Example: Yellow has Workers on planks on his own built Blacksmith card and at the Recruiters' Guild on the board. Now he can activate them. He activates (and reclaims) his Worker on the Blacksmith card and collects 1 Metal from the supply. Then he activates (and reclaims) his Worker at the Recruiters' Guild and collects a Worker of any type from the supply; he chooses a Dwarf for his own reasons.
VISIT THE TRADING POST (once per turn)
Once per turn a player may visit the Trading Post. Each Trading Post visit consists of up to 1 Buy action and up to 1 Sell action, in any order. Prices are listed on the Trading Post section of the Calendar board.
All transactions "with the Trading post" are actually made between the player and the resource supply.


Example: Yellow sells 1 metal to the Trading post for 1 Gold, then uses the Gold to buy 1 Wood from them.
HIRE A GNOME (once per turn)
Once per turn a player may pay 3 Gold to the supply, take a Gnome from the stockpile, and place it on an unoccupied Gnome Lock on one of his built Property cards. The locked action/plank is immediately unlocked and becomes available for normal use. (See the Properties Appendix for Property abilities.)
• A player may only hire a Gnome if he has an unoccupied Gnome Lock on which to place it.
• There are a limited number of Gnomes available for hire per game. When they run out, no more may be hired.

Example: Yellow's built Inn has an unoccupied Gnome Lock. He pays 3 Gold to the supply, takes a Gnome from the stockpile, and places it on the Gnome Lock, unlocking it. The Inn's newly unlocked plank will now be available to him in the next Placement phase.
BUY A PROPERTY CARD (once per turn, after all other actions)
As the last action on a player's turn, that player can pay 1 Gold to the supply to buy one Property card from either the face up draw pool or the top of the draw deck. The bought
card is added to the player's hand. After buying from the draw pool, immediately turn another card face up from the deck to replace it.

Example: Yellow has done everything else he wants to do, and his hand is a little depleted from this round's actions. He pays 1 Gold to the supply and looks at his options. None of the cards in the draw pool interest him, so he takes a chance and draws a card from the deck. It's a Keep, which he is happy to see. He keeps it secret and adds it to his hand. Since this action is always the last action is always the last action of a player's turn, Yellow's turn is over.
4. SCORING
If the Calendar marker is not on a red X, skip the Scoring phase; a new round begins starting with the Calendar phase. If the Calendar marker is on a red X, it's time to score! (There are only three scoring rounds in the game, one at the end of each season on the calendar.) Points are awarded in two categories: District Majority and Worker Majority.
The Scoring chart on each Player Aid displays the points earned for the majority types. As players earn points in either category they should move their markers on the Scoring track to reflect their new scores.

DISTRICT MAJORITY
Score all five districts, but score each district separately. The player with the most Property markers in a district (counting all those on Property, Wall, and Guild symbols) receives 5 points, and the player with the second-most receives 3 points. In games with 4 or 5 players, the player with the third-most receives 1 point.
Ties: If several players have the same number of Property markers and tie for a position, then these players all receive the points normally awarded to the next rank down; all other positions below are also bumped to the next rank down.
DIVIDE AND CONQUER
When scoring districts, sometimes it helps to pull the current district out a bit; it's easier to count Property markers that way.

Example: In this 4-player game, Blue has the most markers in this district (4), so he earns 5 points. Yellow and Purple are tied for second-most markers with 2 apiece, so they both get bumped down to the next rank and earn only 1 point each. Red has been bumped right off the scoring chart and scores nothing.
WORKER MAJORITY
Determine majority for Elves, Dwarves and Gnomes separately. The player with the most Workers of each type receives 3 points. The player with the second-most receives 1 point.
• Master Elves and Master Dwarves only count as 1 Elf or 1 Dwarf respectively.
• The Gnomes being counted are the ones on built Property cards.
Ties: If several players have the same number of a Worker type and tie for a position, then these players all receive the points normally awarded to the next rank down; all other positions below are also bumped to the next rank down.

Elf Example: Red has the most Elves (5), so she earns 3 points. Yellow has 2nd-most (4) so he earns 1 point. Purple and Blue earn nothing for their 3 Elves apiece.
Dwarf Example: Purple and Yellow are tied for most Dwarves (5), so they are both bumped down a scoring level and earn 1 point each. Blue would have been in 2nd place with 4 Dwarves but he's been bumped down off the scoring chart and earns nothing. Red's 3 Dwarves earn her nothing.
Gnome Example: Blue's 3 Gnomes earn him the 1st-place score of 3 points. All other players are tied with 2 Gnomes apiece, so they all bump down a level, right off the scoring chart to zero points.
Once all Scoring markers have been updated to reflect scoring for all 5 districts and all 3 Worker types, a new round begins, starting with the Calendar phase... unless this was the seventh and final round of the game. In that case, proceed to the End Game section to determine the winner!
END GAME
The game ends after the third scoring phase (at the end of the seventh round). The player with the most points wins, and gets the Key to the City!
Ties: If there is a tie, then the tied player with the most resources (Wood, Stone, Metal and Gold) wins; Metal counts as 2 resources for tiebreak purposes. If there is still a tie, then the tied players share the victory.

SWEET SWEET VICTORY.
So you won! You triumphed against all odds, proved that you were the best one for the job in the first place, and probably made some friends along the way. Or not. What's important is that you won. The King showers you with respect and gratitude; he awards you the Key to the City (strictly ceremonial-doesn't actually unlock anything) and the magnificent title Master Castellan of Belfort! (Not to mention a very lucrative contract for future developments.) The Dwarves holler and toast you heartily, the Elves murmur and applaud softly, and the Gnomes go over your expenses and count your points again to make sure you got it right. The people of Belfort raise a loud cheer, and as you bask in their admiration your defeated opponents skulk off; perhaps to design an outhouse or supervise a hole-digging. Congratulations on a job very well done!
APPENDIX: 2-PLAYER GAME
Belfort is fun and challenging as a 2-player game, but it needs some special rules to make up for fewer competing players. It is probably best if you are familiar with how Belfort plays with 3 or more players before attempting to play with 2 players.
To play Belfort with only 2 players, each player is going to have limited control over a 3rd and 4th Non-Player (NP) that will compete for majorities in each district. Follow all the normal rules for Belfort with the following differences:
CHANGES TO SETUP
• The only Interactive Guild that should be used is the Wizards' Guildㅡand it is recommended that this one is used. Any other Basic or Resource Guilds can be used.
• Choose two other colors to use as the NPs. The only things each NP needs are all 12 Property markers, some Workers (see below) and one of the Turn Order Crests marked 3 or 4. The one with Crest 3 will be NP3, and the one with Crest 4 will be NP4. Whichever player holds Turn Order Crest 1 will control NP3. Whichever player holds Turn Order Crest 2 will control NP4. If the player order changes, then so too does the NP that each player is controlling. (NP Crests never change.)
• Each player places one of their NP's Dwarves on a Guild of their choice. Players cannot use a Guild while an NP Dwarf is there. Place 4 Elves and 4 Dwarves of each NP on the top of the Calendar board.
CHANGES TO GAMEPLAY
• Play as normal, but once the Actions phase is over, it's time for the NP turns! Starting with the 1st player, that player chooses a Property card from the draw pool, or from the top of the deck. He then selects an unoccupied Property of that type on the board (if it's a Gatehouse, only a totally empty one may be chosen), places one of NP3's Property markers there (two if a Keep is chosen), and discards the card. Then the 2nd player does the same for NP4. The draw pool is refreshed as needed.
• After each NP has taken their turn, move their Dwarves one Guild clockwise on the board. (If the new Guild is owned by a player, the player collects the usual fee of 1 Gold from the supply.)
CHANGES TO SCORING
• Score each district as if it were a 4-player game; meaning there will be 1st, 2nd and 3rd places.
• For Elf and Dwarf Majority, the NPs are counted as each having 4 Elves and 4 Dwarves (the Dwarves and Elves that you placed on the Calendar board are there as a reminder), so score accordingly.
APPENDIX: PROPERTIES
These are the details for the ten Property card types in the game. There are five of each Property card in the deck.

 PUB
PUB
Cost:
Income: 1 Gold
Income: 1 Gold
Gnome Lock's Action: When you unlock this action with a Gnome, immediately upgrade one of your Dwarves to a Master Dwarf. This is accomplished by flipping one of your Dwarf tokens over so that the Master side is face up. This Dwarf remains a Master for the remainder of the game. You can always confirm how many Master Dwarves you are supposed to have by counting your Pubs with Gnomes.
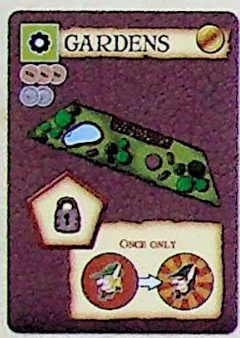
 GARDENS
Cost:
Income: 1 Gold
Income: 1 Gold
Gnome Lock's Action: When you unlock this action with a Gnome, immediately upgrade one of your Elves to a Master Elf. This is accomplished by flipping one of your Elf tokens over so that the Master side is face up. This Elf remains a Master for the remainder of the game. You can always confirm how many Master Elves you are supposed to have by counting your Gardens with Gnomes.

 TOWER
TOWER
Cost:
Income: 1 Gold
Income: 1 Gold
Gnome Lock's Action: Unlocks the plank for future use during the Placement phase.
Plank Action (once unlocked): (fee of 1 Gold to place a Worker) Take 1 Gnome from the stockpile and place it on one of your own unoccupied Gnome Locks as if you had hired it. This Gnome does not count towards the normal 1-Gnome-per-round hiring limit. If there are no Gnomes left in the stockpile or if you do not have an unoccupied Gnome Lock, the action is wasted.

 INN
INN
Cost:
Income: zero
Income: zero
Gnome Lock's Action: Unlocks the plank for future use during the Placement phase.
Plank Action (once unlocked): (fee of 1 Gold to place a Worker) Collect 1 Dwarf or 1 Elf of your color from the Worker supply. This new Worker can be used for the remainder of the game. If there are no Workers of your own color remaining in the supply, this action is wasted.
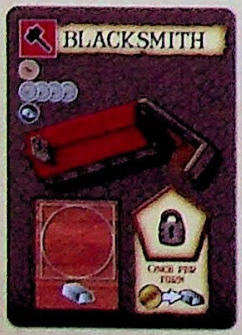
 BLACKSMITH
Cost:
Income: zero
Income: zero
Plank Action: Collect 1 Metal from the supply.
Gnome Lock's Action: Once per turn during the Actions phase, you may buy 1 Metal from the supply by paying 1 Gold.
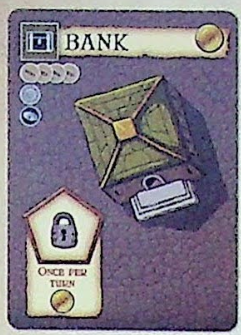
 BANK
BANK
Cost:
Income: 1 Gold
Income: 1 Gold
Gnome Lock's Action: Once per turn during the Actions phase, you may collect 1 Gold from the supply.
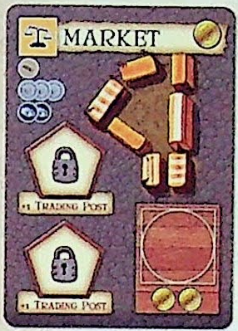
 MARKET
Cost:
Income: 1 Gold
Income: 1 Gold
Plank Action: Collect 2 Gold from the supply.
First Gnome Lock's Action: Every round, you may make a second visit to the Trading Post (consisting of up to one buy and up to one sell) during your turn in the Actions phase. Second Gnome Lock's Action: Every round, you may make a third visit to the Trading Post (consisting of up to one buy and up to one sell) during your turn in the Actions phase.

 GATEHOUSE
Cost:
Income: zero
Income: zero
Metal plaque: Each Gatehouse straddles two districts and has two symbols. When you build the Gatehouse, choose one that has both symbols available and place a Property marker on only one of its symbols (your choice). Two players can never have Property markers on the same Gatehouse.
Gnome Lock's Action: Place a second Property marker on the unoccupied symbol of any one Gatehouse upon which you already have one marker.

 LIBRARY
Cost:
Income: 1 Gold
Income: 1 Gold
Plank Action: Draw 2 cards from the top of the draw deck into your hand, then discard any 2 cards from your hand. (Discarded cards may include either, both, or none of the drawn cards.)
Gnome Lock's Action: When you have finished your turn during the Actions phase, draw 1 free card from the top of the draw deck into your hand. Discard down to 5 cards if necessary.

 KEEP
KEEP
Cost:
Income: 1 Gold
Income: 1 Gold
Metal Plaque: Each section of the Keep has two symbols. When you build a section of the Keep, place Property markers on both symbols (in the same district).
APPENDIX: GUILDS
 BASIC GUILDS

MERCHANTS' GUILD
Cost:
Action: Up to twice during this Action phase, you may receive 1 Metal from the supply in exchange for 1 Wood or 1 Stone.
Action: Up to twice during this Action phase, you may receive 1 Metal from the supply in exchange for 1 Wood or 1 Stone.
Second Action: You are also permitted three additional visits to the Trading Post during this Action phase.
• Each Trading Post visit consists of up to 1 buy and 1 sell action.
• If you do not use your additional visits during this Action phase, they are wasted.
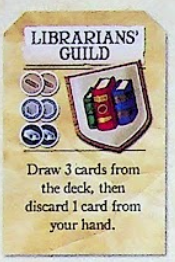
LIBRARIANS' GUILD
Cost:
Action: Draw 3 Property cards from the top of the draw deck into your hand, then discard 1 card from hand.
Action: Draw 3 Property cards from the top of the draw deck into your hand, then discard 1 card from hand.
• The discard may be one of the freshly drawn cards.

ARCHITECTS' GUILD
Cost:
Action: Pick any unclaimed Property, Wall, or Guild symbol on the board and place one* of your Property Markers on it. Pay the usual build cost of that location to the supply, with a discount of 1 Metal or 2 Wood/Stone.
Action: Pick any unclaimed Property, Wall, or Guild symbol on the board and place one* of your Property Markers on it. Pay the usual build cost of that location to the supply, with a discount of 1 Metal or 2 Wood/Stone.
• No Property card is used when the Architects' Guild is used to build a Property, even if you happen to have a matching card in hand. When you build a property using the Architects' Guild, you therefore will not gain any of the income/planks/actions that you would have gotten if you had built the same Property using a card.
• Build costs for all Properties and Walls are shown on your Player Aid; build costs for all Guilds are shown on their tiles.
• Building a Property via the Architects' Guild may result (now or later) in a player having a Property card in hand, with no matching unclaimed Property symbol on the board; in that case the player cannot build the Property and that card is therefore useless.
*If you build a section of the Keep, place Property markers on both symbols. If you build a Gatehouse, choose which symbol upon which to place your marker.

RECRUITERS' GUILD
Cost:
Action: Collect 1 of your own Elves or Dwarves from the supply, to be used as normal for the remainder of the game, or collect 1 Gnome from the stockpile and immediately place
Action: Collect 1 of your own Elves or Dwarves from the supply, to be used as normal for the remainder of the game, or collect 1 Gnome from the stockpile and immediately place
it on an unoccupied Gnome Lock on one of your built Property cards.
• You cannot collect an Elf/Dwarf if there are none of your own left in the supply.
• You cannot collect a Gnome if there are none left in the stockpile or if you do not have an unoccupied Gnome Lock upon which to imme- diately place it.
• If you can collect neither Elf nor Dwarf nor Gnome, this action is wasted.
 Resource Guilds
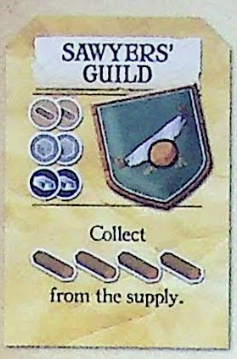
SAWYERS' GUILD
Cost:
Action: Collect 4 Wood from the supply.
Action: Collect 4 Wood from the supply.

BANKERS' GUILD
Cost:
Action: Collect 3 Gold from the supply.
Action: Collect 3 Gold from the supply.

MINERS' GUILD
Cost:
Action: Collect 2 Metal from the supply.
Action: Collect 2 Metal from the supply.

MASONS' GUILD
Cost:
Action: Collect 4 Stone from the supply.
Action: Collect 4 Stone from the supply.
 INTERACTIVE GUILDS

THIEVES' GUILD
Cost:
Action: Pick a player and steal up to 2 Gold from that player, or steal 1 Gold apiece from up to three different players.
Action: Pick a player and steal up to 2 Gold from that player, or steal 1 Gold apiece from up to three different players.

WIZARDS' GUILD
Cost:
Action: Pick two Properties of the same type, or two Guilds, or two Walls. Move all Property markers (if any) from one location to the other, and vice versa.
Action: Pick two Properties of the same type, or two Guilds, or two Walls. Move all Property markers (if any) from one location to the other, and vice versa.
• If a Gatehouse receives 1 marker as part of the swap, you choose which symbol it goes on.

BANDITS' GUILD
Cost:
Pick a player and Steal ог from one player, or steal from up to 2 Wood/Stone from that player, or steal 1 Wood/Stone apiece from up to three different players.
Pick a player and Steal ог from one player, or steal from up to 2 Wood/Stone from that player, or steal 1 Wood/Stone apiece from up to three different players.

SPIES' GUILD
Cost:
Action: Each other player chooses one Property card from his own hand and reveals it face up. From among the revealed cards, you pick one of them and take it into your own hand. All other cards are kept by their owners.
Action: Each other player chooses one Property card from his own hand and reveals it face up. From among the revealed cards, you pick one of them and take it into your own hand. All other cards are kept by their owners.
Social